|
|
| |
|
|
| |
AMIFlash BIOS Update Guide
© x-bit labs - Special Hardware Infocenter
AMIFlash
This utility is created with the DOS/4G technology from Tenberry
Software, which for the most part helps to bypass limitations imposed by
DOS. To be more exact, it allows:
- to overcome the 640KB main memory limit and to grant access to the nearly
entire memory by using protected CPU working mode
- to minimize the exploitation of these 640KB occupying from 5KB to 20KB of
the main memory
- to get direct and complete access to any hardware device, for example PCI-to-ISA
Bridge or Firmware HUB.
The last item is of the greatest importance. The DOS/4G technology provides
32bit access to the memory and the I/O ports address space, so all the chipset
registers can be addressed directly. The opportunity to manage these registers,
in its turn, allows performing some operations in the Flash chip address space.
It implies that in practice we can read the manufacturer's code and the chip
type from the FlashROM, in order to choose the right algorithm for data reading
and writing later on.
It should be pointed out that no other developer of BIOS reflashing utilities,
such as Award Software for instance, uses such a simple solution as DOS/4G.
In the most recent times it looked pretty logical reduce the size of a flash
utility at any rate, even disregarding the quality and features worsening. The
matter is that the file size used to be determined by the FDD capacity, which
equaled 360KB at that time. But now, that the 1.44MB FDD have become an usual
thing, this "traditional" approach is absolutely pointless.
Secondly, AMIFlash can be applied not only for AMI BIOS reflashing, but also
for reflashing the BIOS from any other manufacturer (though this fact is not
announced anywhere officially, of course). Special support modules for corresponding
chipsets and FlashROM microchips grant this ability. It feels as though American
Megatrends aims at making AMIFlash popular among its partners delivering this
software to the end-users. This ides proved to be true by the fact that the
utility itself appeared on AMI's official web-site a very short time ago and
doesn't even have any detailed description (there is just a small readme file
included into the software set). Moreover, the latest version of this utility
is not always available at AMI's web-site as well.
You can download it here.
Please, bear in mind that even though AMIFlash utility is claimed to be universal,
it still doesn't allow reflashing Award BIOS on Intel 810 and Intel 815 based
mainboards.
And finally comes the third advantage of AMIFlash. This program is remarkable
for its module structure, which allows adding the support of any new chip or
chipset absolutely painlessly and without much effort. This feature is definitely
very useful nowadays, since there are more and more types of mainboard Flash
chips streaming onto the market. The latest version of AMIFlash comprises 92
chipset support modules, including even the exotic SMSC VictoryBX-66 and Transmeta
TM3200/TM5400, and 59 FlashROM support modules.
Keys to Success
Now let's discuss how this mighty BIOS reflashing instrument can be applied.
As you may know, for successful BIOS reflashing you should first carry out a
number of easy-to-do manipulations. We'll now describe in brief, what you are
to do before launching the utility. Note that we suppose you have already got
the necessary BIOS update and the utility itself.
First, you should prepare your PC for the reflashing procedure. To do this,
follow the instructions below:
- Return the system into the nominal mode in case it is overclocked.
- Disable all the functions protecting the BIOS against reflashing in BIOS Setup.
As a rule, they are introduced to avoid undue writing into FlashROM and to protect
the system against CIH-like viruses.
- Set the jumper responsible for writes into BIOS (if there is any jumper like
that on your mainboard) into "On" position.
It goes without saying that after the BIOS has been successfully reflashed,
the settings status quo should be restored.
Then you can pass over directly to the BIOS reflashing procedure. Your task
is to boot your PC from the system floppy disk, which should contain not only
the system files but also the AMIFlash utility (amiflash.exe) and the BIOS update
(newbios.bin). Here we would like to draw your attention to the fact that if
you plan to use AMIFlash to update BIOS 4MB (524288Bytes), it will be impossible
to save the old BIOS version on a 1.44MB floppy, as long as the utility occupies
a bit more than 500KB leaving not enough space on the system floppy disk.
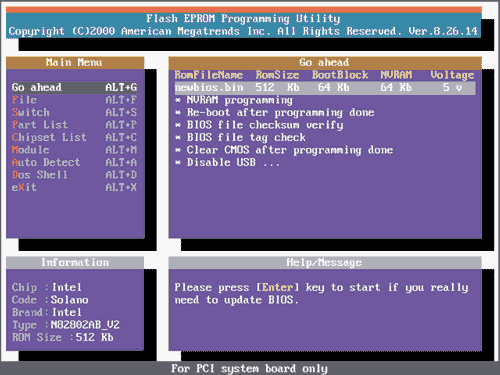
Pic 1. The main screen of AMIFlash dialog mode
AMIFlash works in both dialog and command line modes. Unlike AwardFlash, in
the dialog mode AMIFlash offers the same broad configuration opportunities as
in the command line mode, so we'll highlight both these modes (on the example
of version 8.26.14).
The main screen of the program consists of four parts (see Pic 1)
- Main Menu - available menu items.
- Go Ahead - options available for the current menu item.
- Information - info about the key system components, crucial for the
successful BIOS reflashing (chipset, FlashROM type and size). If any of these
items is marked as "Unknown", we don't advise you to reflash the BIOS - it can
crash the BIOS microprogram. It usually happens if the given AMIFlash version
doesn't include all the necessary chipset components or FlashROM installed on
the mainboard. Or the user might have failed to carry out all the above-described
preparatory actions. It can also be for a wrecked mainboard or FlashROM, which
also happens. - Help/Message - a brief commentary for the selected menu
item.
Since nearly all the information specified in the dialog window can be also
submitted via the command line, we'll also say a few words about the command
line syntax. Further, alongside with the dialog opportunities, we'll provide
a description of corresponding keys.
So, here is what should be done to launch AMIFlash from the command line:
AMIFLASH.EXE [reflashing_file_name] [/key [/key...]]
Most options can be either enabled or disabled. To disable an option you should
type "-" (minus without inverted commas) right before the key (i.e., after the
slash). This feature is really important because the program can memorize the
current mode of each key and store it in an inner configuration file. Accordingly,
if the option is enabled as default, you can disable it any time from the command
line. The detailed information about all the keys can be obtained in a traditional
way by simply launching the utility with /? or /H keys.
Now we'd like to give a brief description of each menu item with the corresponding
keys.
"Go ahead" stands for the launching of BIOS reflashing procedure. Before
you activate this item, you'll have to indicate the name of the file to be reflashed
and, if needed, the file where the old version of the BIOS should be saved.
For these purposes check the next menu item.
"File" serves to set the file names for the files with the new BIOS version
and with the old version. If you press "Enter" when being in this menu section,
BIOS reflashing will start. That's why, if you have to correct some reflashing
settings, just fill in the file names in the corresponding fields and press
"Escape". With the help of the command line you'll be able to specify only the
file name for the new file with the reflashed BIOS. In this case you need to
launch AMIFlash in the following way: amiflash.exe newbios.bin.
The program doesn't allow storing the old BIOS version from the command line,
but you can save the current BIOS version with /S key: amiflash.exe /S oldbios.bin.
When this key is used, the dialog mode remains disabled, i.e. right after the
file is saved, the program closes and you get back to the command line mode.
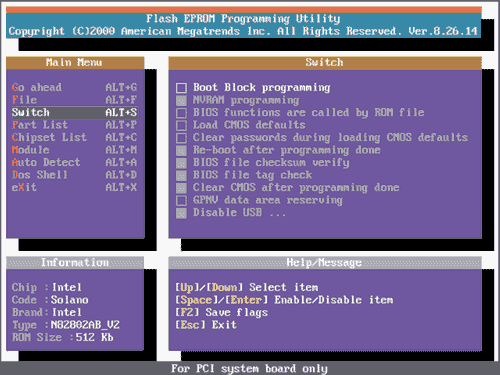
Pic 2. AMIFlash offers a great variety of parameters.
The item "Switch" is used to select the BIOS reflashing settings (see
Pic 2). Each of the settings is related to a command line key.
The next menu items are "Part List" and "Chipset List" allowing
to set the system components needed for proper BIOS reflashing manually. These
components include: the type of FlashROM microchip and the mainboard chipset.
These two items appear quite valuable only if these system components are not
identified automatically or are misidentified. Needless to say that it's unsafe
to set the chip type manually if you're not 100% sure about it. If you are willing
to relaunch automatic identification of the chipset and FlashROM chip, click
the menu item called "Auto Detect".
"Module" - as we have already stressed, AMIFlash features module structure.
Every supported chipset (ID=0) or FlashROM chip (ID=1) is represented by its
own module that can be either deleted, or saved in an individual file, or a
new module from an external file can be added. The last operation can be carried
out with a command line /U[file] key, where "file" stands for the name of the
file with the module to add. Unfortunately, the description of the module formats
is strictly confidential, so the end-users will not be able to ad any new modules
themselves.
Extra Features Apart from the above-enlisted items, AMIFlash sports a
number of features, which are available only in the command line mode.
/A[+] key launches the BIOS reflashing automatically demanding no external
guidance. The chipset and FlashROM microchip are identified automatically as
well. The postfix "+" enables window interface, otherwise the reflashing is
done in the command line mode. Using this key, you are to specify the name of
the file with the new BIOS in the command line. All the settings in this case
have to be changed only via the command line, because the dialog mode is not
supported.
/T[n] key can be used together with /A key only. It determines the number
of attempts, which can be undertaken if the first attempt to reflash the BIOS
fails. The number varies form 0 to 65535.
/Q key disables the output of any messages during the BIOS reflashing.
/X key sets the mode when automatic identification of the FlashROM chip
and core logic is prohibited.
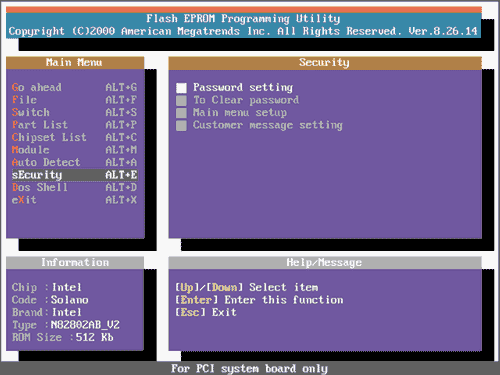
Pic 3. /P key opens the "secret" menu item called "Security"
/P key opens the "secret" menu item called "Security"(see Pic 3), which
allows the user to:
- set a password for entering this menu during the next AMIFlash sessions
- remove the previously set password
- specify the menu items to be available during the next sessions
- edit the message shown in the lower part of the display (by default it reads
"For PCI system board only").
Surely, this function will be most useful for those mainboard makers, which
supply AMIFlash together with their products.
Practical Recommendations
We've made an ample description of AMIFlash features, and now we would like
to give you the optimal configuration of the BIOS reflashing utility. This info
may be helpful first of all for those readers who don't feel at ease with all
these keys, options and parameters.
So, to update the system BIOS, you should follow the above-described steps 1-3
and create a .bat file (called, for example, ami.bat). This file should contain
the following:
@echo.off
if exist oldbios.bin goto program
amiflash.exe /Soldbios.bin
:program
amiflash.exe newbios.bin /A+ /-B /-C /-D /E /-G /I /L /N /R /V
When this bat-file is launched for the first time, the current version of your
BIOS will be saved in oldbios.bin, while the content of newbios.bin will be
written into the FlashROM chip without the user's help. During the following
launches of this file the current BIOS version won't be resaved, so that not
to erase the file with the original BIOS version, which can be needed if the
update fails.
If you prefer working in the dialog mode, simply launch AMIFlash with these
keys:
amiflash.exe /-B /-C /-D /E /-G /I /L /N /R /V
In both cases these properties are a no-brainer: Boot Block won't be reprogrammed,
all the passwords will remain active, the program will preliminarily check if
the new BIOS file is proper and if it corresponds to the given mainboard. After
the BIOS is reflashed the CMOS Setup settings will be set by default and the
system will be automatically rebooted. We hope that if you carefully follow
all our recommendations, the last step will be successfully passed with a new
BIOS already. Have a good reflashing !
AMIFlash BIOS Update Keys
Boot Block Programming (key /B).
The BootBlock is addressed the first at every system reboot. It is changed very
seldom, as a rule there is no need to reprogram the BootBlock, unless the mainboard
manufacturer writes something else in the description of the new BIOS. Please,
bear in mind that a failure during BootBlock reprogramming can make it impossible
to restore the BIOS via software. That's why it is highly recommended to disable
this option.
NVRAM Programming (key /N).
In everyday use, NVRAM (Non-Volatile RAM) is a RAM with independent battery
powering, which serves to store the variables from CMOS Setup. In this context,
NVRAM stands for ESCD variables storing area.
BIOS functions are called by ROM file.
If enabled, this option allows calling the Flash reprogramming function from
the system BIOS. Otherwise, the reprogramming function is called right from
the AMIFlash utility. If the design of your mainboard is so peculiar that AMIFlash
algorithms don't work, you need to enable this function.
Load CMOS defaults (key /C).
It enables you to load BIOS default settings right after the reflashing is over.
Clear passwords during loading CMOS defaults (key /D).
Well, the name of the function speaks for itself here :).
Re-boot after programming done (key /R).
The system will be rebooted right after the BIOS is reflashed.
BIOS file checksum verify (key /V).
If the BIOS content doesn't correspond to the checksum, you'll see a message:
"The BIOS ROM file checksum is BAD".
BIOS file tag check (key /I).
It is checked whether the BIOS file corresponds to the mainboard. The program
looks for special tags - one in the BIOS file and the other in the DMI area
- and compares them to define the mainboard and to see whether the BIOS file
and the mainboard mutually correspond.
Clear CMOS after reprogramming done (key /E).
This option helps to prevent the situations when the new BIOS version forms
data arrays in CMOS, differing from the already existing ones. This may generate
problems with the mainboard reboot. Software CMOS clearing brings about the
same result as the special "Clear CMOS" jumper.
GPNV data area reserving (key /G).
This function works only on mainboards supporting GPNV (Green PC Non-Volatile
Buffer). Otherwise, the user receives the following warning: "The system BIOS
has no GPNV support. This function will be disabled".
Disable USB (key /L).
Regardless of its status, the USB is forbidden while the Flash chip is reprogrammed.
If this option is disabled, the USB bus retains its status in the system. For
the sake of safety, this function is advised to be on.
|
|
| |
|
|
|
|